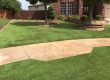
Backyard Putting Green Installation
Installing a backyard putting green can be a great way to improve your golf game and add an attractive feature to your outdoor space. Here’s a step-by-step guide on how to install a backyard putting green:

1. Choose the location and size
Select a flat area in your backyard that receives ample sunlight and has good drainage. Consider the size of the putting green based on your available space and personal preferences.

2. Design the putting green
Plan the layout of your putting green, including the shape, hole positions, and any surrounding landscaping. You may want to include elevation changes, المنحدرات, or undulations for added challenge and realism.

3. Gather materials and tools
You’ll need the following materials and tools for the installation:
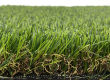
- Artificial turf specifically designed for putting greens
- Drainage material (e.g., crushed stone or gravel)
- Weed barrier fabric
- Infill (e.g., silica sand or rubber granules)
- Marking paint or stakes
- Edging material (e.g., plastic or metal)
- Hole cups and flags
Tools required:
- Shovel or spade
- Wheelbarrow
- Rake
- Utility knife
- Tape measure
- Level
- Stiff-bristle broom
- Tamper or plate compactor
- Turf seam tape and adhesive (if needed)
4. Prepare the area

Mark the outline of your putting green using marking paint or stakes. إزالة أي عشب موجود, نباتات, or debris from the area and excavate the soil to a depth of approximately 4 البوصات.
5. Install the base layer
Add a 2-3 inch layer of drainage material (crushed stone or gravel) to the excavated area. Compact the material using a tamper or plate compactor to create a solid, level base. Ensure that the base layer slopes slightly away from the center of the putting green to facilitate proper drainage.
6. Install the weed barrier
Cover the compacted base layer with a weed barrier fabric to prevent weed growth and protect the artificial turf.
7. Install the artificial turf
Roll out the artificial turf over the weed barrier, ensuring that the pile direction is consistent. Trim the edges of the turf to match the shape of the putting green using a utility knife. If you need to join multiple pieces of turf, use turf seam tape and adhesive to create a seamless connection.
8. Cut holes for the cups

Mark the positions of the hole cups on the turf. Use a utility knife to carefully cut out circular sections of the turf where the cups will be placed.
9. Install the edge material
Install the edging material around the perimeter of the putting green to secure the turf and provide a clean, finished appearance.
10. Apply the infill
Spread the infill material evenly across the putting green using a drop spreader or by hand. Use a stiff-bristle broom to brush the infill into the turf fibers, ensuring that the fibers remain upright.
11. Install the hole cups and flags
Place the hole cups into the holes you cut earlier in the turf and secure them in place. Insert the flags into the cups.
12. Final touches

Use a broom or a leaf blower to remove any debris from the putting green. Enjoy practicing your golf skills in your own backyard!
Remember to maintain your backyard putting green by regularly brushing the turf fibers, removing debris, and replenishing the infill as needed.